Own of the issues I've struggled with
in GIMP is drawing regular shapes, much less complex shapes like concentric circles or stars. After all it's image
manipulation, if I wanted to draw shapes I should use Inkscape. But I
have worked out a way to import and add any map symbols I want using
GIMP. The key is in the Brush tool,
Section 9.2 of the GIMP
instructions provides the steps required to create your own brush.
And in GIMP, a brush can be any shape or pattern.
 |
| Section of Tablua Peutingeriana |
Start by drawing or finding an image with the symbol you want to use. Because of my opinion of my artistic talents, I am using a section of the
Tabula Peutingeriana from a copyright free
image on Wikipedia. The
+British Library also has a section of the map in it's Flicker stream, but didn't contain all of the images I wanted to use.
Here, I've take the section with the image I want and blown it up in GIMP for easier image manipulation. I've selected the symbol I want to use in my map and copied it to the Clipboard.
Tip: When using the Selection tool, the size of the selected area is displayed in the bottom bar of the GIMP window, in the message area to the right of the cursor position. This is important for the next step.
Next I create a new image (File -> New), with the dimensions of the selection and under the Advanced Options, set the Fill to Transparency.
I've pasted the selected area from the Tabula into the new image. Pretty, isn't it? But I only want the city, not the land, roads and sea around it.
Again, I've increased the View to 400% actual size to make image manipulation easier. Now I use the Erase tool to delete all of the drawing I don't need. Because I set the background to Transparent, the square image can be placed on any background without obscuring the layer underneath.
Here's the important bit, even without Saving the image, I export it to my personal Brushes sub-directory. On Windows 8.1, it's ../Rod/.gimp-2.8/brushes. Your installation location will vary. I select to export it as a GIMP brush (.gbr) file. Then click Export.
Click Export on the dialogue box.
Now when I look at the Brushes Dockable Window (Windows -> Dockable Dialogues) in GIMP I see my new Brush (the highlighted square) Note that GIMP automatically made the Clipboard selection into a temporary brush. It's built in and can't be cleared, don't worry about it, it disappears the next time you open GIMP, but your new brush remains!
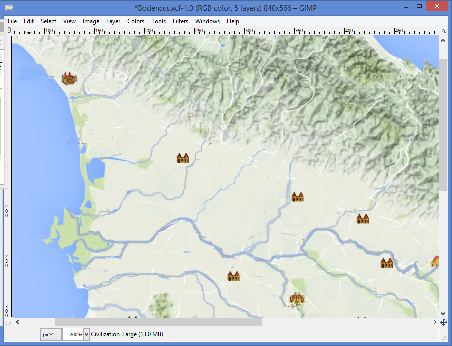
Re-size your brush to produce the size of the symbol you want to appear on your map, place the cursor and click. You've successfully added it to the map.
I hope that this will be of use to some people, the other campaign cartography posts are collected below.
Building Campaign Maps with Google and GIMP series
One,
Two,
Three,
Four,
Five,
Six,
Seven
Mapping Pavis (Inkscape) series -
One,
Two