-->
Showing posts with label Cartography. Show all posts

Thursday, April 23, 2020

Wilderlands - Give Me a Home, Where the Barbarians Roam

Barbarian Altanis are nomadic tribesmen who roam the lands of their more advanced ancestors.  Initial Guidelines Booklet I.

     After laying out the CSIO Market Area and boundaries, looking at the number of villages, castles and citadels on Map 2, I developed a strong impression that there isn't sufficient unclaimed areas to support tribes of nomads.   Rob Conley, in his revision of Wilderlands, assures us that there is plenty of room to fit the nomads in.  Let's see for ourselves.

 
Altanis Village Market Areas
Click for full size
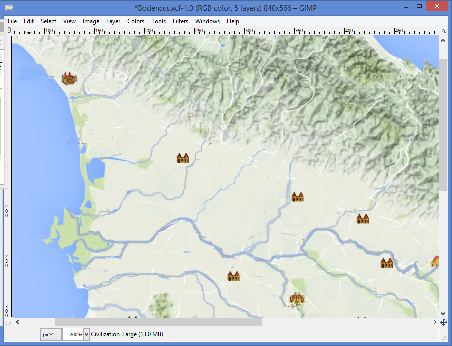
     The first step is to layout the Market Areas for all of the villages on Campaign Map 2.  Technically, they are all Market Class VI in ACKS with a twenty five mile maximum.  (That would only come into effect if the village was located on a road, which only one is, so almost all borders have been shortened using the MP costs from the previous post. )  But Antil is less than seventy inhabitants below the cut off for Market Class V, they exist in a strategic position for shipping on the Romilian Sea - and I was bored with the small areas, so I used the larger area for it.

As can be seen in the Altanis Village Market Area map there is very little area outside the Market Area (the multicolored lines and shaded areas) of some village or another. And I haven't even looked at Barony patrol areas yet.

    Thinking over the image, I decided that it is unrealistic to assume that every hex in the Market
Altanis Village Neighborhoods
Click to enlarge
Area is under continuous occupation or observation by the villages; which would preclude or at least discourage nomads from wandering through.  I decided to reduce the footprint of the villages to their immediate neighborhood, where the fields and pastures worked on a daily basis would be found.  The outer areas are analogous to what Warhammer Fantasy Roleplay refers to as 'Zones of Dependency' where isolated farmsteads, mining claims and natural resources, such a salt licks are to be found.  [Note:  Settlement patterns in WFRP's 'Old World' setting are nothing like Wilderlands, but concept of scattered holdings around the village makes sense.]    This produced the Altanis Village Neighborhood map, where the blue lines show the area surrounding each village that is under daily use.  

Plenty of room for nomads now!  OK, I need to add in the areas patrolled around the castles and citadels, as I don't see a feudal knight allowing a bunch of barbarians to chase a herd of mammoths through his serf's wheat fields.

Per the original Wilderlands of High Fantasy

BARONIES

Upon building a stronghold, player-characters must clear every four hexes (five miles each) radiating from the hex in which his stronghold is located.  While clear terrain can be maintained monster free by patrols, mountains, swamps and dense wood hexes cannot be maintained clear of monsters.  For this reason barons do not usually patrol these areas, prefering [sic] the more tillable clear terrain and hilly areas.

Altanis Villages and Patrolled Areas
Click to enlarge
In this case, I did not reduce the patrolled area by terrain costs, but I did end the patrolled areas at the terrain features listed.  For the most part, as there are a couple of citadels smack in the middle of jungle hexes that would be patrolling something.  In counting off the hexes from each citadel, I have come to suspect that there was some effort made in placing them, as the patrol areas for neighboring citadels usually abut or overlap by no more than a hex.  Rather than laying out these overlapping areas, I chose to map the continuous areas patrolled by the citadels with it.  That brings us to the red lines and shading on Altanis Villages and Patrolled Areas.


Other than the Eyestone Jungle on the east coast, there isn't much that isn't patrolled.  The Lagoldurna Jungle to the east has a string of villages cutting it in half restricting the range of any nomad tribes.

    So, there's no room for nomads in Altanis.  Well, not if you assume a feudal society around the strongholds.  In my next post, I'll cover putting the barbarians back in Barbarian Altanis along with some notes on the barbarian nations to be encountered at the players peril.

Sunday, April 12, 2020

WIlderlands Land Trade Radius and Political Boundaries

        Wilderlands - Land Trade Radius
I started out doing an analysis of land trade routes to determine economic spheres of influence.  I quickly ended up doing political boundaries.  The two are certainly linked in the real world, however I don't provide a segue between them so this post is a bit disjointed.

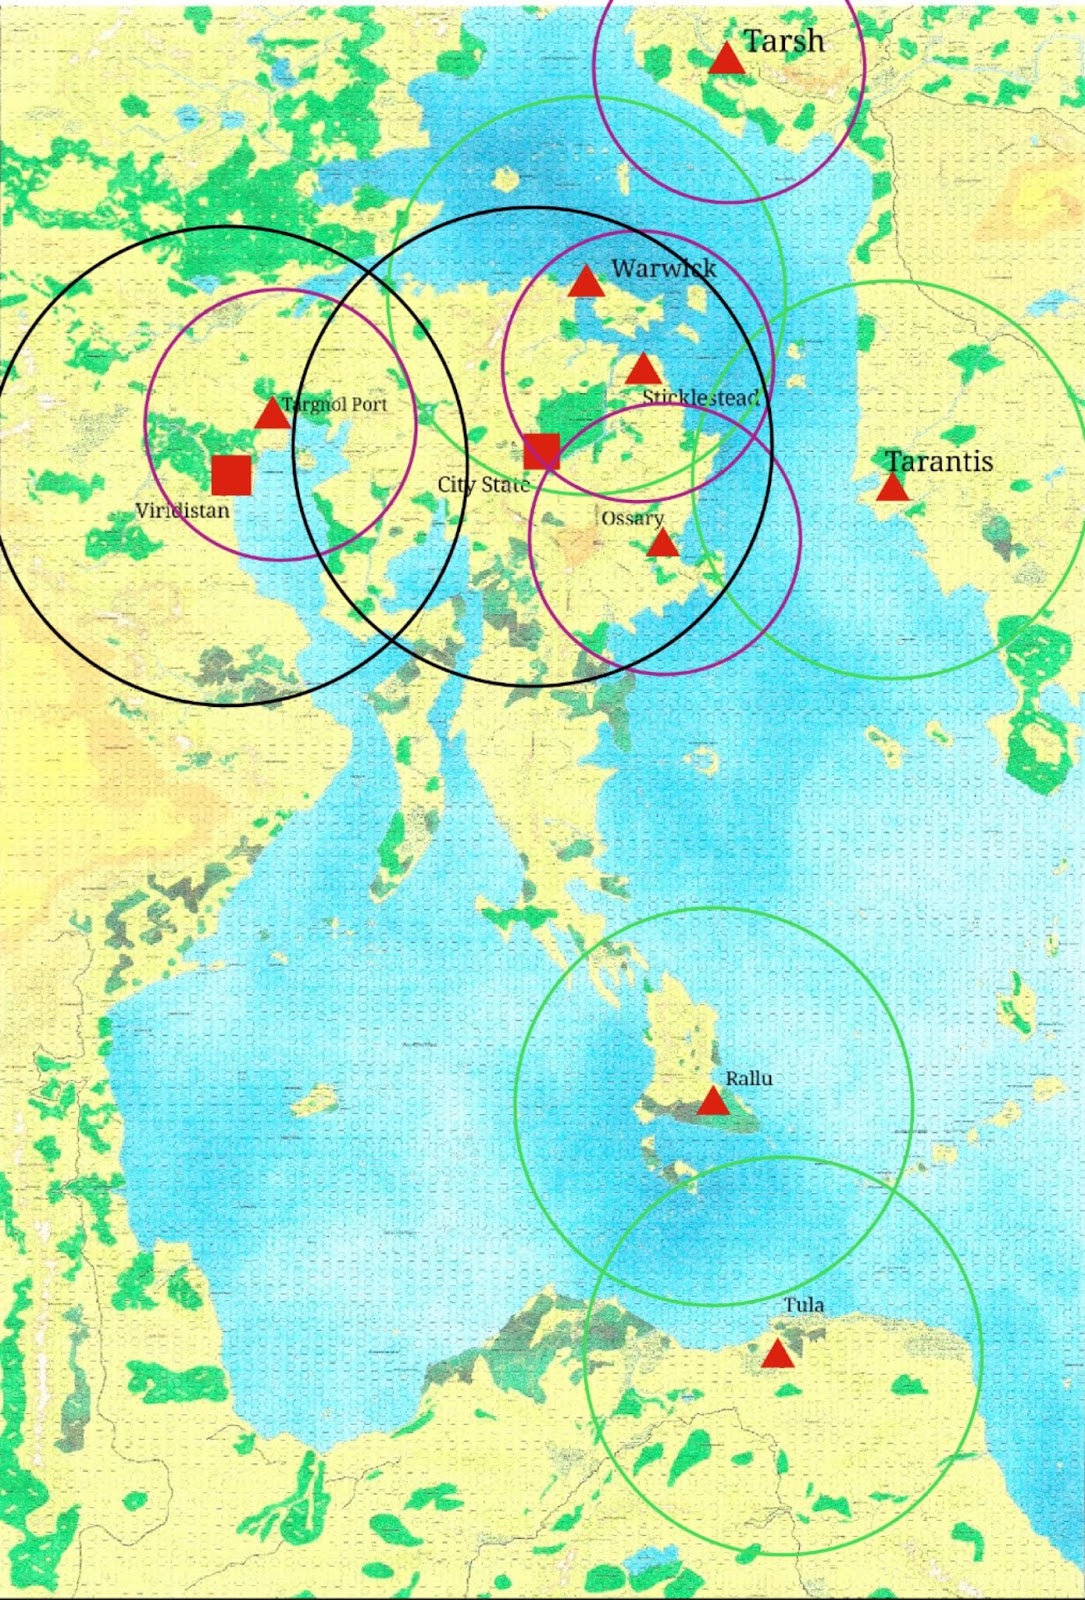
In the first diagram I have entered the locations of the largest settlements and drawn the radius of land trade routes for each.  The radius comes form the Adventurer,Conqueror, King rules -AFAIK, the only system to tackle trade in a systemic way.  Shown are every settlement with over 2500 inhabitants - there's only ten.

The circles represent the approximate maximum distance of trade via a road from the settlement.

Black circles are the largest, they show the trade radius for Class I Markets [Population >= 20,000], limited to Viridistan (City State of the World Emperor) in the west and the City State of the Invincible Overlord in the center.

Green circles show the land trade radius of Class II Markets [Population >= 5,000]: Tarantis in the east, Warwick north of the City State, Rallu and Tula in the south.

Purple circles surround Class III Markets [Population >= 2,500]: Tarsh in the north, Targnol Port in the west and Sticklestead and Ossary east of the City State.

For a bidirectional trade route to have a chance to exist, the circles need to contain both settlements.  See for example Targnol Port and Viridistan.  If only one of the circles contains both cities, then no trade route exists, see the City State and Ossary.  

We have only four potential land trade routes, Viridistand/Targnol Port; City State/Warwick; City State; Sticklestead and Warwick/Sticklestead.

More about this in later posts.

Drilling into the the area of the City State and Viridistan, which is the only area where city states are close enough to have mutual boundaries, I come up with this diagram.  Besides the land trade radius, I have now added political boundaries.
Wilderlands Political Boundaries

Viridistan and the City State are the big dogs of the continent, as such, the smaller city states - especially Warwick, have been quite constrained in their boundaries.  Despite Warwick being the only Class II Market on this map, it actually controls less land area than any of the Class III Markets.  The Rorystone Road and the Dwarven Kingdom of Thunderhold, long an ally of the City State keeps it from expanding west of Demon Tongue or south of the River Stillring.  Port Targnol is a wholly own subsidiary of the Green Emperor in Viridistan.  Probably ruled by the descendants of a former royal house, as canonically there isn't anyone left but the Emperor and Empress in the current royal house - he was extraordinarily thorough in removing potential rivals. 

The reddish area in the middle, Battleplain Gwalion, shows the conflicting claims between the two city states.   The City State claims west to the River Bucknol and Grimlon Outlands, then south through the Buskin Wood to the Romillion Sea.  Conversely, the Emperor asserts his claims all the way east to Ered Cantrif, then south to the River Wakeful from the Falls of Barzani to it's mouth.  In practice the Overlord maintains a line of fortresses from Keystone Peak to Lakenheath on the northern edge of the plains and Viridistan rarely pushes patrols east of the Crossing of Quoth, although tax collectors from both sides plague the villagers in the disputed area. 

Further posts will cover actual trade routes, including laying out additional roads; sea trade; and thoughts on the social structures of the Wilderlands.

Friday, April 19, 2019

Rural Dwellings


     The countryside is not all orc-infested wilderness, individual farms are encountered not only near castles and villages, but also tucked away by themselves in fertile areas. However, they are built with an eye towards defense of the family and livestock, and are able to hold off a casual raiding party for hours; although a determined war party will triumph in the end. Generally, the inhabitants will have reached some accommodation with any intelligent monsters in the area, such as trading chickens for pelts with the local goblin tribe. 
     Smart adventurers will look for these isolated dwellings as the sun begins to set; much better to have a roof over your head and walls around you than camp under the stars or rain clouds. See for example Fritz Leiber's The Jewels in the Forest

Here I present three variations of combination house barns (using the American term; house byre or byre dwelling for the English) superimposed on the traditional five foot grid.

Dartmoor Longhouse 1.

This rude dwelling is a single structure with the family at one end and the livestock at the other. The walls are usually dry stone and the roof is thatch. Inside it is dark and smokey, as the there is no chimney or flue for the open hearth. Always built on a slope, the livestock are kept on the downhill side of the building where a small culvert drains the foul slurry away through the wall. This plan can be used to represent a variety of primitive house barns like the Scottish blackhouse or French maison longue.


Dartmoor Longhouse 2

Externally the same, the interior has been made more habitable by adding posts to support sleeping, storage and haylofts; accessible by ladders. The hearth has become a ventilated fireplace, making the interior less smokey at the cost of reduced light and heat. A manger has been added for feeding the livestock.


More about Dartmoor longhouses here

Low Saxon Farmhouse

More prosperous than the longhouses, this building contains separate entries and rooms for people to sleep in; as well as stables for cows and horses and a indoor chicken coop. Pigs are kept outside. The hearth is open again, but the thatched roof will usually have an 'Owl hole' for the smoke to rise through.  The walls are timber framed and filled with wattle and daub or brick.


More about Low Saxon Houses here

Sunday, January 10, 2016

Floor Plan 1

I found a book of digital floor plans, bought one into GIMP, then played with it adding the Cellar and Attic along with a 5x5 grid.  Based on the fact that no bath is shown, I'd place the plans before 1900.  Perfect for Gaslight adventures or with a quick renovation for 1900-1930 noir/Cthulhu  RPGs.   Really, I'll probably end up using it somewhere I need a random house.

Leave a comment if you have interest in getting the original image or a downloadable format.


Two to four bedrooms on the second floor and two rooms for servants in the attic.  The dashed line in the attic indicates where the ceiling height lowers to a 6' due to the slope of the roof.  The cellar features a modern coal fired boiler and a small secret room.


Sunday, October 18, 2015

Free digital topographic maps

From the US Geologic Survey, digitized maps for downloading.  For you Call of Cthulhu buffs, how about an 1894 Newburyport map?
Wish I had time to pull some of these into GIMP to play with.

Tuesday, October 6, 2015

Random Ocean and Island Terrain Tables

Earlier today there was a request on G+ for ocean and water terrain tables.  I don't know of any and the lack of them dates back to the 1e DMG, which stated that the DM must draw them in by hand.  Chivalry & Sorcery has a similar statement.  

I think the biggest reason no one published them is that you can't reliably randomly generate a meaningful coast line, there's no guarantee in these tables that your coast won't encircle your map or have a strange gap in it.  I've tried to control for that by assuming that you map the coast while you sail along it, but your result WILL vary.

If you have any suggestion for improvement leave a note, drop me a line or put a message in a bottle and heave it overboard.  Of course, I'm up near the falls of the Mississippi, so the last probably won't reach me.

Ocean Terrain Generator

RollDeep WaterShallow WaterIslandBig IslandCoast Trends
1Deep WaterShallow WaterReef5 HexContinues in same direction
2Deep WaterDeep Water1 Hex5 Hex1 hex face left
3Deep WaterShallow Water1 Hex5 Hex1 hex face left
4Deep WaterShallow Water1 Hex6 Hex2 hex faces left
5Shallow WaterDeep Water2 Hex5 HexContinues in same direction
6Deep WaterShallow Water1 Hex5 Hex1 hex face right
7Deep WaterShallow Water1 Hex5 Hex1 hex face right
8Deep WaterShallow Water1 Hex5 Hex2 hex faces right
9Deep WaterReef2 Hex6 HexContinues in same direction
10Shallow WaterShallow Water1 Hex6 Hex Continues in same direction
11Deep WaterShallow Water1 Hex6 Hex1 hex face left
12Deep WaterReef1 Hex7 Hex1 hex face left
13Deep WaterShallow Water2 Hex8 Hex2 hex faces left
14Deep WaterShallow Water1 Hex7 HexContinues in same direction
15ReefIsland1 Hex8 Hex1 hex face right
16Deep WaterShallow Water3 Hex9 Hex1 hex face right
17Deep WaterShallow Water1 Hex10 Hex2 hex faces left
18Deep WaterShallow Water3 Hex11 HexInlet or fjord, coast line comes back out
the same face it entered.
Roll 1d6-2 (min 1) to determine
depth of fjord in hexes.
19Deep WaterIsland4 Hex12 HexContinues in same direction
20IslandShallow WaterBig IslandCoastContinues in same direction
Deep Water vs Shallow Water - There's no set depth dividing the two, shallow water effects (shortening wavelength as determined by the distance between the wave crests and heightening of the crests) occurs when the depth of the water < 1/2 the the wavelength .
For practical purposes, deep water can be considered anywhere where you can't sound the bottom due to the depth.  Sounding the bottom is done with a 150 foot lead line, marked off in 6 foot fathoms.

Reef - a rock or formation lying below mean low water, but protruding up from the surrounding sea floor.

Island - approximate size in hexes or squares if that's what you're mapping on.

Coast - The first time you encounter a coast it will be perpendicular to the direction you are sailing.  Use this column when as you sail along it to determine how the direction of the coast changes in reference to the direction of travel.

Saturday, June 20, 2015

Building Campaign Maps with Google & GIMP 8 - Adding Symbols with GIMP

 Own of the issues I've struggled with in GIMP is drawing regular shapes, much less complex shapes like concentric circles or stars. After all it's image manipulation, if I wanted to draw shapes I should use Inkscape. But I have worked out a way to import and add any map symbols I want using GIMP. The key is in the Brush tool, Section 9.2 of the GIMP instructions provides the steps required to create your own brush. And in GIMP, a brush can be any shape or pattern.

Section of Tablua Peutingeriana


Start by drawing or finding an image with the symbol you want to use. Because of my opinion of my artistic talents, I am using a section of the Tabula Peutingeriana from a copyright free image  on Wikipedia.  The +British Library also has a section of the map in it's Flicker stream, but didn't contain all of the images I wanted to use.


Here, I've take the section with the image I want and blown it up in GIMP for easier image manipulation.  I've selected the symbol I want to use in  my map and copied it to the Clipboard.


Tip: When using the Selection tool, the size of the selected area is displayed in the bottom bar of the GIMP window, in the message area to the right of the cursor position.  This is important for the next step.


Next I create a new image (File -> New), with the dimensions of the selection and under the Advanced Options, set the Fill to Transparency.


I've pasted the selected area from the Tabula into the new image.  Pretty, isn't it?  But I only want the city, not the land, roads and sea around it.


Again, I've increased the View to 400% actual size to make image manipulation easier.  Now I use the Erase tool to delete all of the drawing I don't need.  Because I set the background to Transparent, the square image can be placed on any background without obscuring the layer underneath.


Here's the important bit, even without Saving the image, I export it to my personal Brushes sub-directory.  On Windows 8.1, it's ../Rod/.gimp-2.8/brushes.  Your installation location will vary. I select to export it as a GIMP brush (.gbr) file. Then click Export.


Click Export on the dialogue box.


Now when I look at the Brushes Dockable Window (Windows -> Dockable Dialogues) in GIMP I see my new Brush (the highlighted square)  Note that GIMP automatically made the Clipboard selection into a temporary brush.  It's built in and can't be cleared, don't worry about it, it disappears the next time you open GIMP, but your new brush remains!


Re-size your brush to produce the size of the symbol you want to appear on your map, place the cursor and click.  You've successfully added it to the map.


I hope that this will be of use to some people, the other campaign cartography posts are collected below.

Building Campaign Maps with Google and GIMP series One, Two, Three, Four, Five, Six, Seven
Mapping Pavis (Inkscape) series - One, Two

Wednesday, April 29, 2015

Mapping Pavis II - Building the Neighborhood

Here I will demonstrate building out an area of the Big Rubble using the blank grids I built in Mapping Pavis I.  The area where I want to set the adventure is west of Griffin [sometimes Griffen in the setting] Gate.  On the City map, it's square C9.


I'll start by taking the blank 5x5 square GIMP drawing and exporting as a PDF, which I'll then import into Inkscape and save as an SVG (scalable vector graphics) file.  Opening the Layer menu, I'll add three layers to the SVG, 'Grid', Infrastructure' and 'Subsquares'.  Select the 5x5 grid, and select Layers->Move Selection to Layer, choosing the 'Grid' layer in the dialogue box.

Switching to the Infrastructure layer, I'll add in the city wall, which starts near the bottom right and exits about half way up the left side of C9.  A simple rectangle for the Griffin Gate itself and then a straight road leading out from the gate.   There needs to be other major streets in the town, so I'll add one in branching off of the gate road and going through C9.  It roughly parallels the wall, but I don't want it to be straight, as my conception of Pavis is that, unlike Greek and Roman towns, it was laid out haphazardly.


I'll start with the block four down and three in from the left and map the buildings with in the bock on the 10x10 square drawing I made earlier.  Again export from GIMP as a PNG file, open the PNG in Inkscape and save a an SVG file.  I only need two layers on this drawing, 'Grid' and 'Buildings'.  Again, I move the background grid to the Grid layer and add the wall section so guide my layout.  I'll need to leave a gap for the street cutting across the corner of the square too.

Now to generate the buildings, of course I built a generator, I always do.  It's linked over on the sidebar.  When I built the generator, instead of setting to always build a 100x100 meter block of buildings, I set it so that it randomly selects a 'Nominal block size' and creates contents until it meets or exceeds the nominal block size. I'll just run it until I have enough buildings to fill the area.  In this case twice, I've reformatted the numbers to make a combined list for the block.
No
Type
Floors
Size
(meters)
                                      Description                                       
C9.43.1
E
30x40

The area is covered with tall weeds.
The cellar is made of field stone and has 3 levels. The cellar can be accessed by a open stair inside the left rear corner of the building site. The access has been hidden by brush and weeds.
Any cellar floors in the building have a 10% chance of collapsing the first time they are stepped by any individual character. Any stairs or ladders found in the cellar have a 15% chance of breaking the first time they are used.
C9.43.2
D
10x20
The front right corner foundation of yellow brick remain behind to mark where a building once stood.
C9.43.3
D
10x10
The rear left corner and right wall foundations of brown brick remain behind to mark where a building once stood.
The area is covered with brush, a small tree grows within.
The cellar is made of packed earth and has 1 level. The cellar can be accessed by a hatch without a stair outside the right rear corner of the building. The access is hidden by debris.
C9.43.4
D
10x10
The front right corner , rear wall and left wall foundations of yellow brick remain behind to mark where a building once stood.
The interior is a shallow pit covered with weeds and bushes.
C9.43.5
Empty
10x10

The area is covered with brush, a small tree grows within.
C9.43.6
C
1
20x20
The broken front wall and rear right corner of adobe remain standing to mark the building.
The area is covered with thorns.
The cellar is made of packed earth and has 1 level. The cellar can be accessed by a trapdoor with no means of descent inside the right front corner of the building. The access has been hidden by brush and weeds.
C9.43.7
D
10x20
The front right corner foundation of yellow brick remains visible to mark where a building once stood.
C9.43.8
D
40x40
The left wall foundation of adobe remains behind to mark where a building once stood.
The interior is a shallow pit covered with weeds and bushes. A pool of water has collected at the bottom. Check for wandering monsters.

Building Types paraphrasing from Pavis and the Big Rubble.
    'A' - Intact and inhabited; 'B' - Open to the weather, but inhabitable; 'C' - Shell of the building; 'D' - Foundations poking up through the grass; 'E' - No remains above ground, may still have intact cellars.

Going back to the drawing, it's easy to place the building outlines on it and add labels.

The final step is to turn off the grid (Shift -Control - L) Then click on the eye icon next to the Grid layer in the right sidebar, so that the eye closes.

Click on the drawing, Select All (Control-A), then reducs the scale of the drawing by Object->Transform.  Click on the Scale tab in the Transform dialogue on the right sidebar.  Set the scale to 20% of the original and apply.

Copy the reduced image to the Neighborhood drawing for the C9 block.  Then using the cursor controls, slide it into position in the square 4 down by 3 from the left.  Delete the wall segment that was copied over, tweak the building locations to align at this level, including editing the Path for the main road transiting the square and you achieve this.

Repeat for successive sub-squares.

Now I'm not planning on mapping all of Pavis at this scale, just the pieces where the adventures are.  I'll keep a couple of generic areas for random encounters.


Monday, April 27, 2015

Mapping Pavis I - Setup

I've been fascinated by the Chaosium RuneQuest Pavis and the Big Rubble setting since I first read the saga of Rurik the Restless in the rule-book. A year or so ago, I went out to DriveThruRPG and bought the PDF version. It's a huge setting, 25km2 of ruined city, now inhabited by trolls, broo and other two and four footed vermin - like adventurers. Sealed off for hundreds of years, it was forceably re-opened by the dragonnewts, then re-colonized by Sartarites, and now conquered by the Lunar Empire. I'm considering setting my next campaign there and wanted to start mapping out the ruins. The small scale map included in the PDF being evocative, but not terribly useful for game play.
The first step was to import an image into GIMP and overlap it with a grid. I started with a hex grid, but as I started drilling down, I realized that a square grid would be easier to use.  I took a screenshot of the PDF page, then in GIMP, I opened the image as Layers, edited out the scale given on the image, created a new 'Grid' layer on top of image layer and then used Filter->Render->Pattern->Grid to draw the lines. I set the distance between the lines at 65 pixels. That gave me a little over 100 half kilometers squares inside the walls. Since the PDF says that the walls contain "about 25km2" of land, that's good enough for my work.  Labeling the top row and left hand column provides me with an easy reference system.

The next step is to be able to drill down to individual buildings.  Again I used GIMP to create a large square, first divided into a 5x5 matrix of smaller squares.  The large square at this scale represents on of the squares on the Pavis map, which I'll refer to as a neighborhood.  The 25 squares inside are 100x100 meter 'blocks".

The final layer is another large square, subdivided into a 10x10 matrix.  The large square represents the 'block' in the neighborhood map and is subdivided into 10m2 'lots'.  Or about 30x30 feet - not coincidentally the size of the house I owned in the Chicago suburbs fifteen years ago.

Next I'll demonstrate drilling down to the building and block level.

Thursday, December 11, 2014

Building Campaign Maps with Google & GIMP 7 - Scodra takes shape, but doesn't gel

I've been playing around with GIMP again, wanting to start mapping the local area, especially the town of Scodra and the location of the Castle of the Mad Archmage (Gentius' Palace in the campaign).  While the techniques I documented in the previous posts (1, 2, 3, 4, 5, 6) on the subject work, I find myself scraping the bottom in terms of granularity of the image.

The technique I used was to drill Google Maps down to the highest magnification, remove modern features and replace them with features and names for the setting. I made extensive use of the Smudge tool to soften the edges of the areas I masked. So far so good,

The hexes are approximately 1 mile center to center, I've added the walls of the town roads and a latifundium centered on the twenty year old remains of the legionary camp (Castra Appius).  The black dot on the hilltop is the location of the Castle of the Mad Archmage, just outside of town.

I then selected the center of the image, moved it into a new xcf file and scaled it up by a factor of three.  I immediately noticed that the line I had added pixelated badly when they were blown up, but a little editing and running the Smudge tool over them helped with the appearance.

I then started laying out the interior of Scodra, starting with the king's palace and garden at the east end.  So far so good.  Then the street grid, and because the area is not aligned with the screen pixels, I ended up with jagged edges and blobs.  Not great, but reasonable.  Then I tried placing the 'Old Fish' by the gate - and even at the scale of this image it's visibly not parallel to the street grid.
Perhaps if I can increase the pixel density in the image or go back and blow up the image further, I can improve the quality.  Otherwise I'll leave off buildings and just note the contents of the block.
Not everything succeeds at the first try, the trick is not to be afraid to take the second try.

Friday, October 10, 2014

How Big is that Town?

Urban Population Density in Antiquity
I like the world building aspect of gaming. That's probably the biggest attraction for me to being a DM is to be able to create campaigns and settings. But one of the unanswered questions in all of the RPG materials I have picked up over the years is how big is the town? Not in terms of population size, that goes back at least to AD&D, but in terms of area. Not surprisingly, this is dependent on the type of civilization you are modeling. As Scheidel says concerning urbanization rates in his paper Roman population size: the logic of the debate "we must allow for the possibility that direct analogies between urbanization levels in antiquity and in later periods may simply be irrelevant because they seek to equate conditions in two very different environments: Greek and Roman societies, with their poleis and civitates that fused cities with their respective hinterlands, [than] post-Roman Europe, with its much more pronounced boundaries between city and countryside" Given that caveat, I did some research based on the area figures of classical cities mostly from Ancient Town Planning by Francis Haverfield, generate a correlation between population and area that can then be used as a guideline when constructing urban areas.

For those of you who would prefer not to wade through the numbers below the jump, heres the outcome.
Cities - 326 persons per hectare or 330 ft2 per person
Towns - 233 persons per hectare or 462 ft2 per person

Note that this includes roads, alleys, public buildings and spaces, so the actual size of living quarters will be much smaller.

Sunday, January 13, 2013

Habitat Hijinks I

  I've been struggling with coding habitats for the Hex Crawl Encounter Generator, which explains my lack of productivity this weekend.  I started with the 1e DMG Random Encounter and Random Terrain tables, quickly realized that they are not internally consistent, mixing vegetation, terrain inhabitants and age of the world with gleeful abandon.  I then moved on into defining habitat in terms of distance from coast, terrain, climate and vegetation; which gave me about 140 combinations.  Researching that led me to an old post on ; which is fascinating but didn't move the code.  Now I'm deep into the Koppen and Trewartha climate models and that's not moving the needle either.  I've simplified it to only seventeen distinct climates, but the problem isn't defining the climate, but in defining ranges of climate where creatures may be encountered.  I'd really like a single value to describe the range, but I'm afraid that that may not be practical.  I'm probably going to go back to the object definition for coding but it will be a few days before I can get the updates done to the generator.
  In the mean time, here's a post from +matt jackson  at  ...lapus calumni... with an excellent tutorial on using GIMP and Inkscape to make cool digital dungeon maps.  The only problem I have with it is that I can't draw the original in the first place.

Wednesday, December 26, 2012

Building Campaign Maps 6 - Encounter Areas


 Using the techniques I've already shown, adding layers and a grid, I'm going to add Encounter Areas to my map.  This will be a separate layer for my use rather than something for the players edification.  The first step is to add another layer name 'Encounter Areas'.  The key difference is that now I'm going to change the opacity of the layer, so that previous (lower) layers can be seen through what I draw on the new layer. 


The Opacity control is located in the Layers dialogue box. Here I've set it to approximately 25%, or conversely, what ever I draw will be 75% transparent.

The next step is to add a hex grid to this level, using the same settings previously used on the Grid layer.  The only exception is that I changed the line color to blue. With the Opacity reduced, that makes the superimposed hex grids look purple.

Then I just had to choose which natural features comprised and separated the Encounter Areas, and (tediously) filled in each hex in the encounter area with the Area Fill tool.


In the end I have twenty one encounter areas, in a cool looking map.


Wednesday, December 12, 2012

Building Campaign Maps 5

Having mapped the information known to the players, the next step is to flesh out the map with minor towns, villages and connecting roads.

First I create a new Layer "Minor_Features" to contain the information.  The next decision to make is how many minor towns and villages will there be?  First I'll draw a distinction between small towns and villages; small towns for this exercise are independent communities, while villages are dependent on a larger urban area for a market.  I'll site small towns, such as Claudina and Masio Scampa on the route of the Via Egnatia the same way I sited the large towns and cities. 

For villages, I'll steal an idea from Warhammer FRP, and generate a random number of villages around each of the cities and towns.  Warhammer FRP  used the rule 4d6 villages around a city, but they were looking at population centers over 10,000, whereas Apollonia and Epidamnus are in the 5,000 - 10,000 population range.  So I'll use 2d6 for them and 1d6 for Lissus and Lychnidus.

Siting the villages will be done with some random rolls, one to determine the direction on the hex grid, the next to give an approximate distance.  Then I'll look for a natural feature, such as a river or valley and choose a hex in that area.

Another random number gives me the first letter of the village name, from there I'll choose one from lists of Greek and Illyrian place names available online.

After plotting them on the Minor_Features layer, I'll use the Path tool in GIMP to draw dashed lines for trails between the villages and towns.  The final effort looks like this.


If you compare this map to the version in the previous post in this series, you'll notice that the major roads have been redrawn in black. I liked the effect of the Path tool, better than the hand drawn ones I had done earlier. Good thing I had the foresight to put them on a different level than the terrain, it made deleting them a breeze with no terrain to carefully rebuild like I did when I removed the modern infrastructure.

I still have all the villages in the southern part of the map to add and some more trails to this layer, but that's just finishing it off.  If I come up with a new technique I'll post about it.

Wednesday, November 28, 2012

Building Campaign Maps with Google and GIMP 2

Removing labels, roads and borders

In my last post I had taken an image from Google maps and trimmed off the unwanted borders.  Now for a few techniques in taking the map down to just the terrain.


Here I've taken the previous image and zoomed to a 4:1 scale (400% actual size).  I've found this is the largest scale where I can still recognize the terrain while I'm editing. I'm going to remove the label "Kolonje" in this example, it will demonstrate the technique I use to rebuild land forms that were covered by labels.

Use the eyedropper tool (1) to select the lightest color from the surrounding terrain.  The use the paint brush tool (02), set on a convenient shape, such as "Circle (05)" (3) to paint over the lablel (4).


`
The next step is to use the spray gun tool to rebuild terrain features.  This time select the darkest portion of the feature being rebuilt with the eyedropper and set the spray gun tool to "Fuzzy Circle (03)", this allows the paint to fade out at  the edges.  Draw in the lines you want and then darken the intervening spaces to match the surrounding terrain.


 The last step is to use the eyedropper to select the color of the surrounding terrain and paint over the rest of the label and any roads or other symbols in the area.


Repeat for all the other labels until your map is clean.  It will take several hours, but in the end you'll end up with a map like this.  (In this map, I've stitched together the areas above and below the initial map to build a map of the campaign area).


Tuesday, November 27, 2012

Building Campaign Maps with Google and Gimp

My campaign has been in hiatus for a few months now while I've been playing Alesmiter; so my batteries are recharged and I'm ready to start planning the next round of adventures.  One of the decisions I've made is to move the campaign location from North Africa to Eprius Nova, the area which we now call Albania.  It gives me adventuring areas closer to an urban center.  Time to make a new map.

I'm using a new technique to make the maps, snapshots of Google maps areas, cleaned up and stitched together using GIMP.  I'm not a GIMP expert by any means, but I've been able to figure out how to do things with it fairly easily.  I'm running a campaign set in a fantasy Roman Republic, just after the fall of Carthage and about 90 years before Gaius Julius Caesar invades Gaul.  So Google Maps can be used to build my campaign world.  Of course, any large scale (small area) fantasy setting could be mapped over piece of the real world terrain using these techniques.

Getting the image - I opened Google Maps to Albania at the 5 mile scale and took a snapshot on my tablet.
I saved the image off onto my laptop and opened it in GIMP.

I used Google Maps - Terrain mode because it gives me an effect I like better than the plain Satellite view or the Earth view.  It does have a limitation in that I can't turn labels off in this view.  So I'll have to deal with them later.  The first thing I'll do is crop the control bars on the top and bottom of the image. 

The cross hairs on the pointer (not shown) identify a point on the image, by hovering over the top of the lower control bar, the pointer location circled in the bottom corner of the screen shows that it's at pixel 752.  Similarly I used the pointer to find the bottom of the top control bar, at pixel 58.  752 -58 gives us an image height of 694.


 Using Image -> Canvas Size from the menu I reach this dialog


Click on the chain icon (1) to decouple the image Width and Height, as we don't need to trim the ends.  Set the desired image height (2).  Set your offset from the top of the image (3) - not sure why the value '58' didn't get captured here.  Select to resize All Layers (4), click Center (5) and then Resize (6).  And you have successfully trimmed your image.


In my next post I'll cover techniques for getting rid of those pesky labels, modern roads and borders from the image.